

Create Cover Page for School Notebook
Turn any plain notebook into one you want to open. Choose a subject picture, a colour theme and your school name, fill in the name label, and download a bright, printable cover page for maths, science, English, geography, art, music, computing or any other subject.
Leave the label lines empty if you would rather write by hand. Tap Load sample data to see a finished cover.
Fill in the information below
Other Similar Templates
Some other templates similar to this one are also available here. If you would like to create your COVER PAGE using one of these templates, visit the following.




The first page of every school book
At the start of each term, millions of students do the same small job: label their books. A name on the front stops a notebook from vanishing into someone else’s bag, a subject title makes the right book easy to grab in the morning rush, and a picture or colour makes the whole stack easier to sort. This cover page does all of that in one go, and it looks far better than a strip of masking tape with a name scribbled on it.
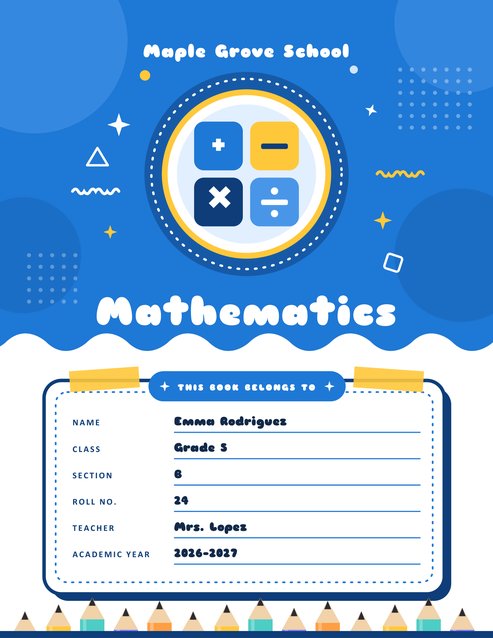
The cover is a full US Letter page designed to be printed and glued, taped or slipped into a clear notebook sleeve. A bold colour panel with a wavy lower edge holds the school name, a round subject badge and the subject title in big friendly letters. Underneath sits a sticker-style name card with six labelled lines, and a row of coloured pencils stands along the bottom of the page.
Who is it for?
- Students: make a matching set of covers for every subject and start the term organised.
- Parents: prepare the school supplies at the kitchen table, with one colour for each child.
- Teachers: print a class set for exercise books, project books or reading journals.
- Tutors and homeschoolers: give each subject its own look so that a pile of workbooks never gets muddled.
- Schools and nurseries: hand out cover sheets at the start of the year with the school name already added.
- Anyone with a journal: use the “General” picture and your own heading for a diary, a recipe book or a hobby log.
Eight subject pictures
Pick the drawing that matches the book from a drop-down list. Each picture is drawn in the colours of the theme you choose, so the badge always matches the page.
- Mathematics: four tiles showing plus, minus, times and divide.
- Science: a bubbling laboratory flask.
- English / Language: an open book with a bookmark.
- Geography / Social Studies: a globe on a stand.
- Art: a paint palette with a brush.
- Music: a pair of beamed musical notes.
- Computer Science: a monitor showing code brackets.
- General / Other: a stack of books with a pencil, ideal for history, religion, health, languages and everything else.
The subject title is typed separately, so the picture and the words can differ. A language class could use the English picture but be titled “French”, and a physics book could use the science flask and be titled “Physics”.
Four colour themes
- Ocean: a calm, bright blue with sunshine-yellow accents.
- Sunset: a warm orange-coral with golden touches.
- Forest: a fresh green with yellow details.
- Grape: a rich purple with yellow highlights.
A simple system works well: give each subject its own colour (blue for maths, green for science, orange for English, purple for art) and the right book can be found from across the room.
Filling in the cover
- School name. Optional. It is printed in white along the top of the colour panel. Add a school logo and it sits in a white badge on the left.
- Subject name. The large title. Short words are printed bigger, and longer ones shrink so that they always fit on one line.
- Subject picture and colour theme. Choose from the two lists.
- Label heading. The words on the ribbon above the name card. It reads “This book belongs to” unless you change it, so you could write “Class Notes”, “Homework Book” or “Lab Journal” instead.
- Name, class, section, roll number, teacher and academic year. Fill in as many lines as you like. A line left empty stays on the cover as a neat ruled line for writing by hand, which is handy when you print one blank cover for many pupils.
Each caption has a small pencil icon. Click it to rename the printed word: “Class” can become “Grade” or “Form”, “Section” can become “Division”, “Roll No.” can become “Student ID”, and “Teacher” can become “Instructor”.
Printing and attaching the cover
- Download the PDF and print it at 100 percent size on white paper. A slightly heavier paper of 100 to 120 gsm looks best and resists creasing.
- For a notebook smaller than a full page, trim the sheet with a paper cutter, leaving the coloured panel and name card intact, or print at “fit to page” and cut to the size you need.
- Stick the cover on with a glue stick or double-sided tape, starting from the spine edge and smoothing outwards so no bubbles form.
- For durability, cover it with clear book film, or print the page and slide it into a clear notebook sleeve or binder pocket.
The same page also works as the front sheet of a ring binder, a project folder or an exercise-book wrapper; just change the heading and subject to fit.
Tips for a tidy set
- Use the same theme across all your books and change only the subject and picture, so the set looks like a matching collection.
- Write names in the form so that they are neat, or leave the name line empty and add it in pen after printing.
- Keep the school name short; very long names are printed smaller.
- Print one test page on plain paper first to check spelling, then print the final copy on better paper.
- Do not put a home address or phone number on a cover. A name, class and teacher are enough for a lost-and-found box.
Classroom ideas
- Ask younger children to colour or decorate the white space around the label before they glue the cover on.
- Run a “design your cover” lesson: each child picks a subject picture and a colour and explains why.
- Use the cover as a first writing task by having pupils fill in every line themselves.
- Print a class set with only the subject filled in, and let every student add their own details.
Questions people ask
Can I print covers for several subjects at once?
Create one cover, download it, then change the subject, picture and colour and create the next.
Does it fit an A4 notebook?
The page is US Letter. When printing for A4, choose “fit to page”; the layout scales neatly.
Can I leave every label line blank?
Yes. The lines stay printed so that you can fill them in with a pen.
Is it only for school?
No. Use the General picture and your own heading for journals, recipe books, hobby logs and planners.
Does it cost anything?
No, it is free to create and download.